Battle 6: Anafect
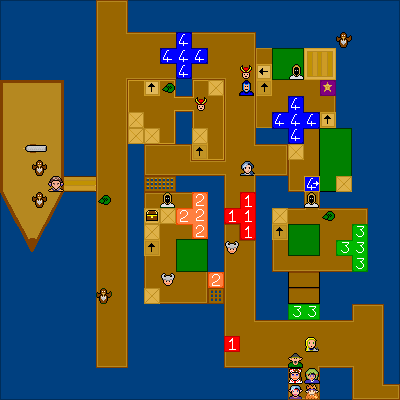
On face value, this seems quite a straightforward battle - the enemy forces aren't overwhelming in number, and you've got a choice of routes to take down Produn. However, a word to the wise - Produn has 120HP (although luckily for you, you can't get to him), and you should also pay attention to the cannon on the ship to the far left of the map. When you step past certain points, Stella will order the cannon to be fired, destroying part of the docks! These points are numbered and colour co-ordinated - ie, when you step past point one (in red), the cannon will destroy the red cross-shaped formation marked with the matching number, and this obviously goes for the other numbers and colours too. Got that? Right, let's do this!
With this in mind, there is only one real route you're able to take. You can still head left to take the treasure chest, which contains a potion, but you won't be able to go any further. Similarly, you can't rush to Produn along the main gangway, as that's the first to be destroyed (depending on your route). I would recommend you send a few fighters to the left, to defeat the Dwarves and recover the potion, and then your force should rejoin and head down the steps, past point three.
One thing you mustn't forget throughout the battle is that the gangways are on different levels, and you can only go up by standing on the boxes of fish and fruit stored there. I've marked these boxes with arrows showing the route you can take (at point four, you should go right along the green box, as otherwise you'll be stuck). To be honest, the enemies shouldn't give you too many problems here - stick Medion against the Dwarves, Rock and Medion against the Produn Knights and you should be able to take down the Birdmen and Snipers without any problems. Really, the only obstacle in this battle is the cannon, but that shouldn't trouble you too much longer.
Once you reach the square I've marked with a star in the top-right corner, Stella will decide that it's a much better idea to have Produn on the ship, so she orders the Birdmen to carry him away! This brings us to the second map.
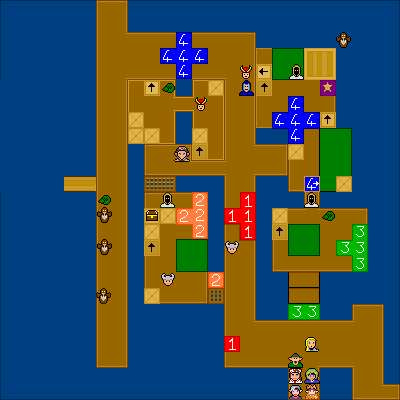
As you can see, Stella has moved from the ship onto the main battlefield, as have the two Birdmen. However, don't try and kill her! Instead, take down everyone else - the Aspinia Mage can be annoying, but it's quickly overwhelmed, and the same goes for the Priests. Just make sure you don't move your force too close to Stella, because she's quite handy with that rapier.
Defeat all characters except Stella, and then move one of your characters next to Medion and select "Talk", which has appeared at the bottom. Answer "yes" to both questions, and you'll let Stella go back to her ship (you'll have to play Scenario III to find out why you'd want to show mercy :P).
With Stella and Produn sailing away into the sunset, all that's left is for you to make your way through what's left of the docks, and into Anafect itself. Congratulations!
Newts

